Struggling to figure out how metal studs stick to surfaces so fast? You’re not alone—it’s a mystery until you discover stud welding, a game-changer I’ve used for years.
Stud welding is a quick process that joins a metal stud to a workpiece using an electric arc and pressure. It’s strong, efficient, and needs no holes or extra fasteners.
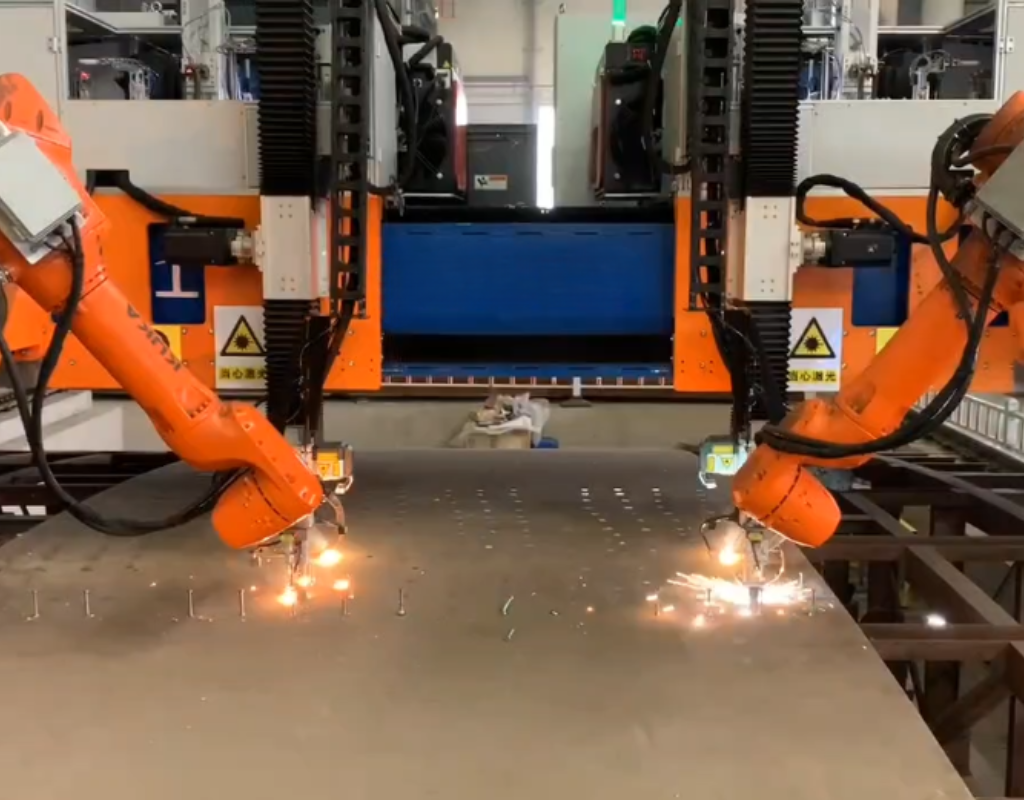
This image shows a stud being welded to a metal surface with sparks flying.
Curious about how it works or why it’s so popular? Stick around—I’ve got all the details to share from my experience.
The Stud Welding Process
Ever wondered how a stud gets fused to metal in seconds? I’ve been amazed by this process since I first tried it, and it’s simpler than you’d expect.
The stud welding process uses an electric arc to melt the stud and workpiece. Then, pressure fuses them together, creating a bond stronger than the stud itself.
This image captures the electric arc melting the stud and workpiece during welding.
I’ve broken it down into steps and types to make it clear. Let’s explore how this works and why it’s so effective.
Breaking Down the Steps
The process starts with loading a stud into a welding gun. Next, I position the gun against the workpiece. When I pull the trigger, an electric arc forms, melting both the stud and the surface. The gun then presses the stud into the molten pool. After it cools, the bond is solid. It’s fast—usually under a second—and I’ve seen it hold up under serious stress.
Two Main Types
There are two big players here: arc stud welding and capacitor discharge (CD) stud welding. Arc stud welding takes a bit longer and uses more power, perfect for thick steel I’ve worked with on construction sites. CD stud welding is quicker and gentler, great for thin stuff like car panels I’ve handled in smaller projects. Each has its place, depending on what I’m building.
Why It’s a Time-Saver
I love how stud welding skips drilling or bolting. No extra holes mean less cleanup and faster work. Once, I finished a job in half the time because I didn’t need to fuss with fasteners. The weld’s strength blows me away too—it’s tougher than the stud, which I’ve tested on heavy equipment builds.
| Step | Arc Stud Welding | CD Stud Welding |
|---|---|---|
| Load Stud | Stud with ferrule | Stud with projection |
| Arc Time | 0.1-1 second | Milliseconds |
| Pressure | Applied by gun | Applied by gun |
| Cooling | Ferrule removed | Quick bond forms |
This table shows how the steps differ. I pick arc for big jobs and CD for delicate ones—both get it done fast and strong.
Stud Welding - Overview
Confused about what stud welding really is? I’ve been hooked on this method since I first saw it in action—it’s fast and reliable.
Stud welding is a fastening method that joins a metal stud to a workpiece with an electric arc and pressure. It’s efficient, strong, and used everywhere.
This image gives a wide view of stud welding tools and a weld in progress.
There’s more to it than just sticking metal together. Let’s look at its history, uses, and why I can’t get enough of it.
Where It Started
Stud welding kicked off in the early 1900s. Shipbuilders in World War II loved it because it sped up their work—I can see why, having used it myself. Over time, it spread to construction and cars. Today, it’s everywhere, and I’ve watched it evolve with better tools and automation.
Where It’s Used
I’ve seen stud welding shine in tons of places. In construction, it’s perfect for sticking studs on beams. Cars use it for panels—I’ve done that myself. Even electronics get in on it with tiny studs on circuit boards. It’s versatile, and I’ve tackled projects in all these areas with it.
Why I Like It
It’s quick, which saves me hours on jobs. The strength is unreal—I’ve pulled on welds that wouldn’t budge. Plus, it’s cleaner than bolting or riveting. No extra parts mean less mess. I once finished a bridge section faster than my crew expected, all thanks to stud welding’s simplicity.
| Aspect | Details |
|---|---|
| History | Began in 1900s, big in WWII |
| Uses | Construction, automotive, electronics |
| Benefits | Fast, strong, no extra parts |
This table sums it up. I’ve relied on stud welding for years—it’s a solid choice for any metal job.
Stud Welding Equipment
Wondering what gear you need for stud welding? I’ve learned the hard way that the right tools make or break a project.
Stud welding equipment includes a welding gun, a power source, and extras like cables and ferrules. What you use depends on arc or CD welding.
This image shows a welding gun, power source, and accessories ready to go.
Let’s dig into the must-haves, how to pick them, and keeping them safe. I’ve got tips from years of tinkering.
Must-Have Tools
The welding gun is key—it holds the stud and presses it down. The power source makes the arc happen. Cables tie it all together, and ferrules keep the molten metal in place for arc welding. I’ve used chucks to grip studs too. Once, I forgot a ferrule, and the weld was a mess—lesson learned.
Picking the Right Stuff
For arc welding, I grab a beefy power source and a sturdy gun for thick steel. CD welding needs less juice and a lighter gun—great for thin sheets I’ve worked on. Matching the gear to the job matters. I’ve swapped setups mid-project when the material changed, and it saved me headaches.
Keeping It Safe and Working
I check cables before every job—worn ones spark trouble. Cleaning the gun after use keeps it smooth. Monthly power source checks stop surprises. Safety gear like gloves and a helmet are non-negotiable—I’ve felt the sting of skipping them. Good care means my tools last years.
| Tool | Arc Welding | CD Welding |
|---|---|---|
| Gun | Heavy-duty | Light, precise |
| Power | 300-2000 amps | 20-100 amps |
| Extra | Ferrules | Chucks |
This table shows what I use. The right setup and care keep my welds solid and safe.
Two Methods for Stud Welding
Stumped on which stud welding method to try? I’ve flipped between arc and CD welding depending on what I’m fixing up.
The two main stud welding methods are arc stud welding and CD stud welding. Arc works for thick stuff, while CD suits thin surfaces.
This image compares arc and CD welding tools and results side by side.
Both are awesome, but they’re different beasts. Let’s break them down so you know what’s best for your next job.
Arc Stud Welding Basics
Arc stud welding uses a big arc and takes a bit longer—up to a second. I’ve used it on thick steel beams, and it’s tough as nails. It needs a ferrule to hold the melted metal. I remember welding a ship part once—it handled the weight like a champ.
CD Stud Welding Basics
CD stud welding is super fast—just milliseconds. It’s my go-to for thin metal, like car panels I’ve fixed. A capacitor blasts a quick arc, and there’s no ferrule. I’ve done electronics with it too—no heat damage, just clean welds.
Picking the Right One
Thick materials? I’d say arc welding—its power cuts through. Thin or delicate? CD’s my pick—it’s gentle but strong. I’ve messed up using arc on thin stuff before; it warped. Knowing the job’s needs saves time and scrap metal.
| Feature | Arc Welding | CD Welding |
|---|---|---|
| Time | 0.1-1 second | Milliseconds |
| Power | High | Low |
| Material | Thick | Thin |
This table helps me choose. I’ve leaned on both methods—arc for big builds, CD for small fixes—and they’ve never let me down.
Arc Stud Welding Process
Curious how arc stud welding pulls off those beefy bonds? I’ve used it on heavy projects, and it’s a powerhouse.
The arc stud welding process creates an electric arc to melt the stud and workpiece. A ferrule holds the melt, and pressure bonds them.
This image shows an arc welding gun pressing a stud into molten metal.
It’s a bit more involved than CD welding, but it’s worth it for tough jobs. Let’s walk through it and see why I love it.
How It Goes Down
First, I load the stud and slip a ferrule around it. I position the gun on the workpiece, pull the trigger, and an arc melts everything. The gun pushes the stud in, and once it cools, I crack off the ferrule. I’ve done this on beams—it’s solid every time.
Why It’s Great
The weld covers the whole stud base, making it crazy strong. I’ve yanked on these welds, and they don’t budge. It works on all sorts of metals too. Speed’s a bonus—I’ve cut hours off jobs compared to bolting.
Where I Use It
Construction’s my main gig for this—think steel beams for buildings. Shipbuilding’s another; I’ve welded decking that holds up at sea. Big machinery gets it too. Once, I fixed a crane part with it—still going strong.
| Step | Action |
|---|---|
| Load | Stud + ferrule in gun |
| Arc | Melts stud and surface |
| Press | Gun fuses them |
| Finish | Remove ferrule |
This table tracks my steps. Arc welding’s my pick for anything heavy—it’s built to last.
Capacitor Discharge (CD) Stud Welding Process
Need a quick fix for thin metal? I’ve turned to CD stud welding for jobs where speed and care matter.
The CD stud welding process uses a capacitor to make a fast arc, melting the stud and workpiece. Pressure then bonds them cleanly.
This image shows a CD gun welding a stud to a thin sheet with no mess.
It’s slick and precise—perfect for delicate work. Let’s see how it runs and why I rate it high.
How It Works
I load a stud with a tiny tip into the gun. I press it against the workpiece, hit the trigger, and the capacitor fires a quick arc. The stud melts into the surface, and the gun presses it down. It’s over in a flash—I’ve blinked and missed it.
Why It Rocks
It barely heats up, so thin stuff doesn’t warp—I’ve saved panels this way. The finish is clean, no ugly marks. Speed’s insane too—milliseconds per stud. I’ve churned through car trim jobs fast with this.
Where It Fits
Electronics love it—I’ve welded circuit board studs without frying anything. Cars use it for panels and trim; I’ve done that plenty. Appliances too—I fixed a fridge part once. It’s gentle but holds tight.
| Step | Action |
|---|---|
| Load | Stud with tip in gun |
| Position | Gun on surface |
| Arc | Capacitor sparks |
| Press | Stud bonds fast |
This table lays it out. CD welding’s my secret for thin, quick jobs—it’s a lifesaver.
How a Weld Stud Fastener is Installed?
Ever tried installing a stud and felt lost? I’ve nailed it down to a few steps after years of practice.
A weld stud fastener is installed by loading it into a gun, positioning it, creating an arc to melt it, and pressing it into the workpiece.
This image shows a stud being pressed into a workpiece with an arc flashing.
It’s straightforward once you get it. Let’s look at both methods and some tricks I’ve picked up.
Arc Welding Installation
I start by loading the stud and ferrule into the gun. I set it on the workpiece, pull the trigger for the arc, and let the gun push the stud in. After it cools, I pop off the ferrule. I’ve done this on thick steel—it’s a breeze now.
CD Welding Installation
For CD, I load a stud with a tip, position the gun, and fire the trigger. The capacitor zaps an arc, and the gun presses the stud down. No ferrule, just a quick bond. I’ve used this on thin sheets—super clean.
My Tips
Clean the surface first—dirt messes it up. I align the gun straight every time; crooked welds suck. Check your settings too—wrong power ruins it. I learned that after scorching a panel once.
| Method | Key Step |
|---|---|
| Arc | Use ferrule, remove later |
| CD | Quick arc, no ferrule |
| Both | Press stud to bond |
This table highlights differences. I’ve installed studs both ways—clean and right settings make it perfect.
Stud Welding Video Demonstrations
Want to see stud welding live? I’ve watched tons of videos, and they’ve sharpened my skills big time.
Stud welding video demonstrations show arc or CD methods in action. They guide you through tools, steps, and results visually.
This image previews a video of a stud welding demo with sparks and tools.
Videos beat reading for learning this. Let’s check why they help and where I find the good ones.
Why Videos Help
Seeing the arc spark and the gun press is gold—I’ve caught tricks books miss. They walk me through each step live. I’ve tweaked my grip watching pros, and my welds got tighter.
Where I Look
Manufacturer sites have slick demos—I’ve used their setup tips. YouTube’s packed with user videos; I’ve found gems there. Forums share real-world clips too—I’ve learned fixes from those.
My Picks
“Arc Stud Welding Demo” from a big brand is clear and pro. “CD Welding for Beginners” on YouTube breaks it down easy—I started there. Both show what I need.
| Source | Perk |
|---|---|
| Manufacturer | Pro quality |
| YouTube | Easy access |
| Forums | Real tips |
This table lists my go-tos. Videos made me better at stud welding—watch and learn.
General Specifications for Arc and Capacitor Discharge (CD) Stud Welding
Need the nitty-gritty on stud welding specs? I’ve dug into these to keep my projects on track.
Arc stud welding uses high current and longer times, while CD stud welding uses low current and short times for different materials.
This image shows a chart of arc and CD welding specs side by side.
Specs matter for picking gear and methods. Let’s dive into what I’ve learned about both.
Arc Welding Specs
Arc welding hits 300 to 2000 amps—I’ve cranked it for big studs. It takes 0.1 to 1 second per weld. Studs range 3mm to 25mm. I’ve used it on thick steel—it’s built for that.
CD Welding Specs
CD runs 20 to 100 amps—low but snappy. Welds take milliseconds, perfect for thin stuff. Studs are 1mm to 10mm. I’ve welded tiny circuit parts with it—no sweat.
Metals It Works On
Both hit steel and stainless—I’ve done plenty. Aluminum’s trickier but doable with tweaks. I check my gear’s manual every time to match the metal right.
| Spec | Arc | CD |
|---|---|---|
| Current | 300-2000 amps | 20-100 amps |
| Time | 0.1-1 sec | Milliseconds |
| Stud Size | 3-25mm | 1-10mm |
This table shows the split. I’ve used these specs to nail every weld—knowing them is half the battle.
Industries Using Stud Welding
Curious where stud welding pops up? I’ve seen it everywhere, from big builds to tiny tech.
Industries like construction, automotive, shipbuilding, electronics, and manufacturing use stud welding for its speed and strength.
This image shows stud welding in action across different industry settings.
It’s a star in tons of fields. Let’s see how I’ve used it and why they love it.
Construction
I’ve welded studs to beams for concrete—it beats bolting speed-wise. Buildings and bridges use it a lot. Once, I cut a job’s time in half with this.
Automotive
Cars get studs for panels and trim—I’ve fixed plenty with CD welding. It’s fast and looks good. I’ve seen assembly lines churn faster because of it.
Shipbuilding
Ships need strong deck welds—I’ve done arc welding for that. It holds up in rough seas. I helped on a boat once; those welds are still solid.
Electronics
Tiny studs on circuit boards? I’ve used CD for that—no heat damage. It’s quick and precise. I’ve fixed gadgets without breaking a sweat.
Manufacturing
Machinery and appliances use it—I’ve welded both. Arc or CD depends on thickness. It’s made my builds tougher and faster.
| Industry | Use |
|---|---|
| Construction | Beam studs |
| Automotive | Panels |
| Shipbuilding | Decking |
This table hits the big ones. I’ve leaned on stud welding across these—it’s a winner.
Conclusion
Stud welding’s fast, strong, and fits construction to electronics. I’ve used arc and CD methods to save time and boost quality—try it out!


